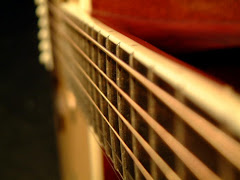
So, you made the decision to buy that guitar you've been thinking about. You loaded up on all the essentials: guitar case - check, guitar picks - check, cables - check, amplifier - check, effects - check, guitar strings - wait a minute. Did you say guitar strings? Doesn't this guitar I just bought already have guitar strings?
The answer is yes. Hopefully, they are the kind that the manufacturer recommends for the kind of guitar you have just purchased. The first suggestion is to ask the music store where you purchased your prized possession what kind of strings your guitar has on it, if you can't tell by looking. Not all guitar strings are the same. But understanding the differences doesn't have to require a PHD in guitar string technology. Just keep in mind the sound and style you are looking for.
It simply requires a little bit of reading and a general understanding of the sound that each type of string design produces, and trying out a few and deciding on one that you like. We are going to take a look at some of the most popular types of guitar strings in a little more detail in order to help you make an educated decision on choosing the best guitar strings for you.
The Guts
Some of the earliest produced guitar strings were made out of either wire or gut (called "cat gut, although usually made out of sheep intestine). Modern guitar strings are divided into two main types - nylon and steel. Classical and Flamenco guitars are likely to use nylon strings, while electric, flat-top and arch-top acoustics would use steel wire strings.
Guitars are usually strung with a set of six guitar strings, each a different thickness and tuned to a different pitch. The usual layout is the first and second are "plain", the fourth, fifth, and sixth are "wound", and the third can be either. Of course there are 12-string guitars, 7- string guitars, 8-string guitars, bass guitars (which usually have 4, but I have seen as many as 8). The basic premise remains the same, there are just more strings.
Understanding the Basics
Since it is not very practical to make thick strings, the only way to increase the mass of the bass strings is by wrapping them in extra wire around their central core. These would be called wound strings. The core would be either round or hexagonal. In steel guitar strings it is a steel core, and in nylon, yep, nylon.
The wire winding material can vary. They can be generally classified as "white" or "silver" metal (stainless steel, nickel, nickel alloy, silver-plated copper) or "gold" or "yellow" metal (bronze, brass, or some other alloy). Both types can be used on acoustic guitars, but most players typically prefer the yellow bronze or brass strings due to their bright, crisp sound. You can only use certain guitar strings on electrics with magnetic pickups though, the white metal ones because of their magnetic responsiveness. Yellow metal strings and nylon guitar strings will not work with a magnetic pick-up. If your guitar has a contact transducer or a microphone you can use any type of guitar strings.
Guitar strings can take on a variety of shapes based on the winding they are given.
Roundwound Strings
In order to produce the bottom three or four strings (the wound ones), the nylon or steel core is wrapped with a long, continuous length of round wire. They are typically wound by a machine that spins the central core. The result is a string with a crisp tone and volume, and they give a clear ring that is fitting for either acoustic or electric guitars when the strings are new.
Flatwound or Tapewound
These strings have a much smoother surface than that of roundwound strings. The reason is because the winding is not made from a wire but rather from a flat metal tape or ribbon.
The problem of finger squeak (the noise produced by the left hand when moving up and down the fingerboard when making contact with the guitar strings) and trying to find a solution to overcome it, led to the design of the flatwound string. The flat surface of the flatwounds help reduce this noise.
Flatwound guitar strings are a more mellow sounding string than roundwound and are preferred by jazz guitar players because of it. Rock guitarists don't typically care for them, due to their lack of brightness, and not much percussive tone compared to the roundwounds. They also tend to not last as long.
Compound flatwounds are made with both a round and a flat winding. The are first wound round and then covered with a flat ribbon winding. Jazz players also tend to love these.
Groundwound Strings
Guitar string makers were searching for a way to combine the advantages of roundwound and flatwound strings and created the groundwound guitar strings. Produced much the same way as the roundwound strings (by wrapping a round wire around a core, grinding down the winding and then polishing it to remove the protrusions. This produces a "flattened" surface), groundwounds provide some of the bright tone quality, projection and sustain as roundwounds and the smoother feel of flatwounds.
Silk and Steel Strings
Often called "compound strings", these are special because the inner core is made up of a combination of steel and silk. The treble strings are plain steel. The bass strings are a steel core wrapped with a fine layer of silk fiber and then a regular metal winding. Typically only used on acoustic guitars, the sound and feel falls somewhere between that of steel and nylon.
It's Your Choice
You now have the information you need to make an educated choice to choosing your guitar strings to develop your sound. The best advice I can give you is to try out different things. maybe as you start replacing guitar strings, try a new brand or new winding type until you have found the ones you like best. Guitar strings are as personal as your guitar. You have to play what you like.
Happy playing!
TRURewindMusic.com Guitar Strings and Accessories up to 55% Off!
Sunday, August 16, 2009
Sunday, July 26, 2009
Developing Finger Dexterity
When learning to play the guitar, especially in the beginning, it is important to develop and practice the right habits and techniques. When you are trying to develop finger dexterity, it is absolutely critical to be able to use your finger tips when playing, especially when attempting to play scales.
There are several cool exercises to help you develop your finger dexterity and allow you the finger strength that you need to be able to become accomplished. Typically the best of these exercises involve playing patterns that require you to play each and every fret on the keyboard accross all strings, not focusing too much on the scale you are playing or the key. You want to be sure to use your finger tips and not the flat part of your finger to properly complete.
To explain the exercise, I found a video on youtube that does a good job in demonstrating the technique, which you can watch. To put it in to words for you to follow, hold your guitar as you normally would with your fret hand on the neck. Start at the 5th fret of the 6th string (A) and play each note in sequence through each of your 4 fingers. 1st finger on 5th fret, 2nd on the 6th fret, 3rd on the 7th fret, and 4th on the 8th fret. Continue this pattern down each string and return back to the sixth in reverse order. Practice getting faster and faster and fluent at the pattern and reverse and then shift up one fret and repeat.
This exercise is great for beginning guitar players, but also as a warm up for guitar players of any skill level. You can also use variations of this exercise as you learn new techniques like hammerons, etc. Focus on playing it as quickly as you can, but no faster. This will force you to play cleanly to keep your guitar playing from sounding sloppy.
I hope you find this exercise helpful.
Happy Playing!
www.trurewindmusic.com
Sunday, July 19, 2009
The Minor Scale
There are three different minor scales - the natural or relative minor scale. the harmonic minor scale, and the melodic minor scale.
Each of these has an individual step pattern, but they all share one element that differentiates them from the major scale. The first and third notes in the scale is always a tone and a half (one whole tone plus a semi-tone). This is called a minor third , and it is a contrast to the major third interval characteristic of the major scale. The minor scales differ from each other in terms of whether the 6th and 7th steps of the scale are raised (made sharp) or not.
The foundation of minor scales is easier to understand if we start by looking at how the natural minor scale is related to the major scale, and then go on to see how it is altered to produce the harmonic and melodic minor scales.
The Natural Minor Scale
As the "Ionian Mode" is the predecessor of the major scale, the natural minor scale is derived from what was called the "Aeolian Mode" Both of these modes were diatonic scales - played on the white notes of a keyboard. But, the difference is the Aeolian starts on the A, versus the Ionian starting on the C.
What this means is that the notes of the two scales are the same. But, because the natural minor scale has a different starting position, it has it's own step-pattern: tone (1st note to 2nd), semi-tone (2nd to 3rd), tone (3rd to 4th), tone (4th to 5th), semi-tone (5th to 6th), tone (6th to 7th), tone (7th to 8th). The 8th, of course being the octave.
When you compare the C major and the A minor scales, you will see that the 3rd note of the minor scale is the 1st note of the major scale (C), and the 6th note of the major scale is the 1st of the minor scale (A). This relationship is the key in understanding the connection between major and minor scales. Every major scale has a relative natural minor scale, and each minor scale a relative major scale.
Finding the relative scales is pretty easy. It is 3 semi-tones down from the major to the minor, and three semi-tones up from the minor to the major.
The major scale and it's relative natural minor scale share the same "key signature," therefore, they share the same notes. But, because the start at a different place, they have different step patterns and a different sound.
The Harmonic Minor Scale
The harmonic minor scale was developed as a result of the principles of harmony applied to the construction of chords.
A chord can be built on each note of the scale and the most important are those built on the 1st note (the "tonic" or I chord) and on the 5th note (the "dominant" or V chord). One of the three notes that goes to make up the dominant chord is the 7th note of the scale. In the major scale, the 7th note is one semi-tone below the tonic. But, in the minor scale, the 7th note is a whole-tone below the tonic. This translates to mean the dominant chords built on the 5th notes of major and natural minor scales do not have the same effect. In order to overcome this problem the 7th note of the natural minor scale is raised (made sharp) by a semi-tone. The new scale is called the "harmonic minor" scale.
The Melodic Minor Scale
The problem with the harmonic minor scale is that when you reduce the interval between the 7th and 8th notes to a semi-tone, the interval between the 6th and 7th is increased to three-semi tones (a minor third). If this were a melody line, it would be an unacceptably big jump. The solution is to raise the 6th note of the scale by a semi-tone. In A minor, it would be an F to an F#, and it would reduce the interval between the 6th and 7th notes to a tone. The result is a smoother melodic "flow." This method is effective when going up in pitch (ascending) and the scale that is produced is called the melodic minor for it's improved melodic potential. When playing a descending melody, it is not so important to have the semi-tone interval between the 7th and 8th notes, because the melodic flow is naturally smooth. Because of this, the ordinary minor scale is used.
I found a cool video by Justin Sandercoe that explains the difference between the minor scales and talks a bit about cadence, which we will cover later.
I hope this helps!
Happy playing!
www.trurewindmusic.com
Monday, July 13, 2009
Developing a Sense of Timing
Without question the easiest way to improve your timing is to play with good musicians. It is the most effective way of learning to keep up with the tempo of the song, and it teaches you about rhythm and how rhythm is established.
The drummer, bass player and rhythm guitar player create rhythms by playing different parts, not by playing on the same beat. This creates a complex and interesting "composite" rhythm and it is critical that each player have a good sense of timing and a feel for what other members of the band are playing. Any band that have put in a lot of practice and have gotten their timing right will sound "tight" and effective.
However, it is not always possible to play with other players either by choice or by circumstance. This is when developing a sense of timing becomes more difficult. Varied tempo is sometimes done on purpose for effect in songs, however, as a beginner, you should focus on learning regular and steady tempos. There can be a very real danger in losing your timing when it comes to a tough chord change or a difficult run.
To remedy this, it is recommended to employ a metronome or drum machine. These are a must have for the practice tool box, because it reminds you when you go out of time and keeps a steady beat to keep you in line.
The simplest and cheapest of these "time-keepers", the metronomes are, in my opinion the best solution because they are simple to use and travel well, in case your practice space varies. Most metronomes operate on a battery and plug directly in to your amplifier to produce "standard" rock rhythms.
The more expensive drum machines can provide programmable, complex beats, and usually require hours of study to get to understand them, although the end result is often worth it.
The other alternative is to just use the old fashioned "play along with the cd or mp3." Which was called a cassette tape in my day.
Like anything else when it comes to your guitar playing, it takes time and practice to master having great timing. Stick at it and practice good habits!
I hope this helps.
Happy playing!
www.trurewindmusic.com
Tuesday, July 7, 2009
Using a capo
A capo is a cool little device that allows you to play a chord progression in different keys while retaining the same chord shape. It acts like a sort of artificial barre on the guitar strings, much like your finger does when playing a barre chord.
The capo fits around the guitar's neck and raises the pitch of all six guitar strings. The fret that it's placed in determines the amount by which it raises them. If you place the capo on the first fret, you will raise the open string by one semi-tone; put it on the 2nd and it will be raised by two semi-tones; and so on. What this translates to is that an open chord of C major played with a capo on the first fret becomes C# major, and the same shape with the capo on the 2nd becomes D major. Basically, the fingering remains the same, but the notes are different.
Let's say you wanted to sing a melody to go with a fingerpicking using the chord progression of Am-G-F-E but the key in which it is written is too low for your voice. You would feel more comfortable if it were raised a semi-tone to the key of Bb minor. A capo allows you to change the key and continue to be able to play pretty easy chords without having to re-tune your guitar. If you placed the capo on the first fret of the neck of your guitar, the same sequence would now be Bb-Ab-Gb-F. Since these four chords can only be played as barre forms, which (without a capo) would become much more difficult - especially during finger picking, the capo provides an easy solution. But, the finger positioning wouldn't change from the original key as it was in the key of A minor. This makes the fingering much easier.
How to fit a capo
The capo is clamped over the fingerboard of the guitar just behind the chosen fret so that it raises the pitch of any chord you play.
I found a cool video on You Tube by ivideosongs that demonstrates a little more about the use of a capo.
www.trurewindmusic.com
Friday, June 26, 2009
Tuning Methods
This week, we will discuss some of the many different ways to tune your guitar. Getting your guitar in tune is one of the most important first steps to becoming a competent guitar player.
Many beginning guitar players find it very difficult to tune a guitar. The reality is that the technique or tools you use really depends on the ability of your ears to perceive differences in pitch between two separate notes, and the ability to recognize good intonation when you hear it and the difference when you don't.
If you are just starting out and don't know the difference between tones, I recommend using an electronic tuner to do the work for you.
Although it is very important to develop your ear to be able to tune manually, an electronic tuner is a very good tool to have, as it can often overcome noisy environments and is virtually fool proof.
Some people find the ability to judge pitch easier than others. If you are one of those that find it difficult, understand that your ability to judge pitch will improve, along with your technique, the more you play. You will eventually develop a musical "ear" and it is a skill which develops with experience.
The best approach to good tuning is to take your time and go slowly and calmly. Being tense or in a hurry will find it hard to recognize whether a particular string is sharp or flat.
Always try to tune UP to pitch, not DOWN to a pitch. What that means is that you should slacken the string slightly so that it goes slightly flat and then tighten it to bring it up into tune. This helps to keep it stable at the right pitch.
For many guitarists, string slippage is a big problem. It can be virtually prevented by ensuring that you use the right guitar strings that fit and "stretching" them properly, by hitting them fairly hard, bending them or pulling them away from the guitar to give them a chance to settle down before playing them.
If you use lighter gauge strings, the problem of going out of tune is exaggerated. This problem can be common if you subject your guitar to drastic temperature changes, from a cold room to a warm room, or vice-versa.
The methods to be described will allow you to tune your guitar to itself (relative tuning). In order to be tuned to standard concert pitch, you must have at least one accurate reference note (found by using a device such as an electronic tuner).
Tuning to Chords
Guitars typically sound perfectly in tune in one chord but slightly out of tune in others. It's part of their nature. It is due to the intervals between notes being fixed by frets. In order to minimize this, the positioning of the frets is designed to spread out across the fingerboard any inaccuracies in the intervals between notes. In effect, the guitar will sound correctly in tune in very key. This is called "tempered tuning."
Tuning to chords is a great way to check and, if needed, adjust the compromise of the tuning. Once you have the open strings in tune with one another, play a chord, sounding each individual note and listening clearly to the intervals between them. I usually use a progression of the G, C, D chords to ensure that they all sound right. If they don't determine which note(s) sound out of tune and adjust accordingly.
Tuning to Harmonics
"Harmonic" notes will be covered in another lesson. If you don't know what they are, skip this method for now.
Harmonic notes often have a purer sound than the open strings of fretted notes. This is because of the phenomenon called "beat tones." Beat tones are generated when two pitches are close but not quite the same. If one note is vibrating at 440 Hz (A) and the other one is slightly flat, at, for instance 436 Hz, you will be able to hear 4 beat tones or pulses per second when you play them together. As the out of tune note is brought to the tone of the original note, the beats will slow down, or even disappear as they become totally in tune.
The place on the fret board to check this is the 5th fret on the lower string vs the 7th fret on the next highest string. For Example, if you were tuning the 'E' string and the 'A' string, you would ring the 5th fret harmonic on the 'E' string and measure the tone against the 7th fret harmonic on the 'A' string. This is the same on all strings with the exception of between the 'G' and the 'B'. The 5th fret on the 'G' should ring the same as the 4th fret 'B'.
I hope you find this helpful in developing your ear to tune your guitar.
For all of your guitar strings and guitar accessories needs, please visit www.trurewindmusic.com
Thursday, June 18, 2009
Scales and Modes - A Brief Lesson in Theory
The earliest forms of scales have roots that go back to the ancient Greeks, named after their most important tribes - the Dorian, Phrygian, Lydian, and Mixolydian. Each of them contained eight notes (from the root to the octave). These notes were the equivalent to the notes on the white keys of the piano keyboard, written in descending order.
The Dorian scale descended from E, the Phrygian from D, the Lydian from C, and the Mixolydian from B.
Musicians from the Christian Church adopted these scales in the Middle Ages. But for some reason, they decided to introduce various changes. First, they reversed the order, to make them ascending. Second, they changed the root notes. Third, they changed the term from "scale" to "mode." This made the formerly known Greek Dorian scale the Dorian Mode and made it from D to D, the Phrygian Mode went from E to E, Lydian Mode from F to F, and the Mixolydian Mode went from G to G. And the Greek Lydian scale, originally descending from C, now ascended from C and was renamed the Ionian Mode. Also, the Greek Mixolydian Scale, which descended from B, now ascended from B and was renamed the Locrian Mode. The scale that began on the A was called the Aeolian Mode.
This now meant that there were 7 modes - one for each of the white keys. We have already seen that the characteristic sound of any scale or series of notes is determined by its step-pattern of tone or semi-tone intervals. Since each mode has its own step-pattern, each mode has it's own sound.
In the Middle Ages, the modal system was the source of melody. By the 16th Century, the increasing complexities of "polyphony" (music which contains 2 or more harmonized melody lines) were leading to the breakdown of the modal system.
There was a new harmonic language being developed as the 17th Century began. The concept of "tonality" was expanded to include the key system (which is another lesson). All music had a "key signature" which identified the tonic (or first) note of the scale as the "key-center" or "home key." The intervals between notes were fixed by their distance from the tonic note or key center.
The heart of the key system was the concept of diatonic major and minor scales. A "diatonic" scale comprises the notes proper to the key. The diatonic major scale has the same pattern of tones and semi-tones as the medieval Ionian Mode (started on C), and the diatonic natural minor scale has the same pattern as the Aeolian Mode (which started on A). The resemblance, however, is one of structure, not usage.
For all your guitar strings and accessories needs, check out www.trurewindmusic.com
Subscribe to:
Posts (Atom)